Today, I'm going to cover a product photoshoot I did with some Immi branded instant ramen. The company sent me the products at no cost, so just keep that in mind as we go. The plan was to take photos of the packaging and the prepared ramen, and then I'll give it a try myself and share my thoughts.
Check out the video on YouTube for a lot more information and photos:
Related videos & playlists:
- 7Artisans 85mm f/1.8 for Nikon Z Overview
- LCD monitor as a backdrop for photography
- My videos on the Nikon Z5 camera.
- Weeylite Ninja 20 studio light.
- GVM LED panel light.
Check out Immi ramen's official website (not a sponsored link):
 |
| The Immi "Surprisingly Healthy" Instant Ramen Variety Pack and a bag of Veggie Topping Mix. |
Included with the ramen was a bag of Veggie Topping Mix, which should add some nice visual interest to the final photos once the ramen is cooked. The variety pack I have is "Variety Vol. 1," (not a sponsored link) which includes three different plant-based flavors: Black Garlic "Chicken," Spicy "Beef," and Tom Yum "Shrimp."
 |
| A look at the ingredient lists for Immi ramen. |
According to the packaging, this ramen is positioned as a healthier alternative. Some of the highlights are that it's high in protein with up to 24 grams per serving, low in net carbs with only 5 grams, and 100% plant-based. The topping mix is a product of China and contains ingredients like dried cabbage, carrot, tofu, and mushroom, while the ramen itself is a product of Malaysia.
The Photoshoot Setup and Gear
For this shoot, I used my Nikon Z5. It's a great lower cost all-rounder camera for photography. One feature I find particularly important for anything remotely professional is its dual memory card slots. I have them set up for instant backup, so every photo is saved to two cards simultaneously. It's a simple step that provides peace of mind in case one of the cards fails.
 |
| The Nikon Z5 has two memory card slots, which I use for instant backup. Take note that it can't use both cards when recording video. |
I used a few different lenses to get a variety of shots. I started with the 85mm, which is a lens I often use for YouTube thumbnails because of its nice compression and focal length. I also used a 40mm and a 28mm lens to get wider, more dynamic compositions.
In photography, focal length refers to the distance between the lens's optical center and the camera's sensor. A longer focal length, like 85mm, narrows the angle of view and magnifies the subject, which can create a pleasing compression of the background. A shorter focal length, like 28mm, provides a wider angle of view, capturing more of the surrounding environment.
 |
| These Meike macro extension tubes allow any lens to focus much closer than it normally could. |
To get some really close-up detail shots, especially of the noodles, I used a set of macro extension tubes. These are hollow tubes that you place between the camera body and the lens. They don't have any glass elements, but by increasing the distance between the lens and the sensor, they allow you to focus much closer to your subject than the lens normally would.
 |
| My two-light setup, featuring a large softbox as the key light and a smaller panel light for fill. |
My lighting setup was pretty simple. I used a two light setup in a "clamshell" configuration. One main light, a Weeylite Ninja 20 with a large softbox, was positioned to the side, and a GVM panel light was placed higher up. Both lights were set to a color temperature of 5600K, which mimics daylight, to ensure the colors of the product were accurate.
Staging and Photographing the Products
I started by photographing the packaging. I arranged the box, the individual ramen packs, and the topping mix bag in different compositions on a simple black desk against a neutral gray curtain.
 |
| A product shot featuring the ramen packs stacked on top of the variety pack box. |
The shiny plastic on the ramen bags created a lot of reflections, which was a challenge. With a simple setup like this, you have to move the product and the lights around to find an angle that minimizes distracting glare.
As one of the video commentors mentioned after I published my video, you can likely get around or partially deal with reflections on packaging by using a circular polarizer filter on whatever lens you are using. Sadly, I didn't think to use one for this photoshoot. Maybe if I do something similar in the future and I'll put a bit more time into the entire process.
A circular polarizing filter works by first using a linear polarizer to selectively block light waves vibrating in certain directions, reducing glare and reflections from surfaces like water or glass. This initially produces linearly polarized light. However, for modern cameras with autofocus and metering systems, linearly polarized light can cause malfunctions. To prevent this, the filter incorporates a quarter-wave plate as a second layer. This quarter-wave plate converts the linearly polarized light into circularly polarized light, which is compatible with the camera's internal sensors and ensures proper function without affecting the photographic effect of reduced reflections and enhanced colors. (CPL description generated by the AI mode of Google)
 |
| A close-up of a single ramen pack against a simple, colorful background. This is unedited. |
 |
| One of the photos with a colored folder after some light editing. |
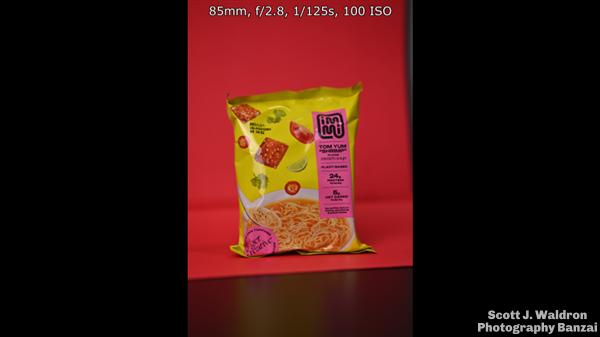
To add some color and interest, I used some inexpensive colored folders as backdrops. At 25 cents each, they're a very cost effective way to create a somewhat uniform background for small products. I tried red, blue, and yellow to see which worked best with the product's packaging.
 |
| Three of the packed with the yellow folder. I edited out the white and black product scan code on the folder. |
 |
| Using the blue folder with the 85mm lens plus one of the macro tubes to get more magnification. |
 |
| A photo with the 28mm lens. |
Preparing and Tasting the Ramen
After getting some shots of the packaging, it was time to prepare the ramen itself. I wanted to capture what the final product looks like for a customer. I put the block of uncooked noodles in a bowl and added hot water.
 |
| A close-up of the ramen using both macro tubes and the 40mm lens. |
While the noodles were softening, I added the flavor packet and a generous amount of the veggie topping mix. The mix includes tofu, corn, and dried vegetables, which rehydrated in the hot water and added a lot of color and texture to the dish.
 |
| The final prepared bowl of Immi ramen, with the veggie topping mix and seasoning added. |
Once the ramen was ready, I took some final photos of the prepared bowl, trying to make it look as appetizing as possible. I used chopsticks to lift the noodles for a classic "noodle pull" shot, which adds a sense of action and makes the food look more appealing.
| The "noodle pull" is a classic food photography shot that adds dynamism to the image. |
Finally, it was time for a taste test. I tried the Spicy "Beef" flavor. The noodles have a very unique texture, almost a bit squeaky, which is different from typical instant ramen. I think this is due to its high-protein, plant-based ingredients. To me, it's like the difference between white bread and wheat bread. This ramen is the "wheat bread" of the instant noodle world; it has a denser, heartier more "healthy" taste to the base noodle. There's a good amount of spice in the broth, and the toppings added a nice variety of texture plus flavor. I found that I enjoyed it more as I kept eating it.
 |
| Trying out the Spicy "Beef" flavor with the veggie toppings. |
This was a fun little photoshoot. You don't need a lot of expensive equipment to get decent product photos. Good lighting is key, but you can create nice results with simple tools like colored folders and macro tubes. Being able to use a mix of lenses helped capture different perspectives, from wide, "epic" shots with the 28mm to tighter, more intimate shots with the 40mm and 85mm.
Meike MK-Z-AF1 Auto Focus Macro Extension Tubes:
- Vol. 1 variety pack: https://amzn.to/4lCFUcI
- Topping mix: https://amzn.to/413On0b
As an Amazon Associate, I earn from qualifying purchases.