A few photos with information on how they were made:
 |
| I had a photoshoot with a cosplayer that I know well. This was one of the many photos I had taken. I like the back-lighting and overall contrast of the image. I probably was using wireless flash from the upper right. (D600, 50mm, f2, ISO 800, 1/90th) |
 |
| This photo was taken in the hallways of the convention. I like the “in your face” perspective as well as the bright colors. The 28mm lens on full-frame is still capable of nice background blur in many situations. (D600, 28mm, f2.4, ISO 800, 1/90th) |
 |
| This photo was taken at the cosplay contest. I decided to go with the 85mm lens instead of the 70-210mm because the room was really small. The only issue I had was that I couldn’t stay at this angle because it was the route that cosplayers walked through. It’s too bad because it was the best angle for photos. (D600, 85mm, f2.2, ISO 900, 1/160th) |
 |
| This cosplayer was in character the entire time. It was a bit difficult communicating with her while she was doing that, but it was kind of amusing. The photo on her phone was a picture of me. (D600, 50mm, f2.5, ISO 160, 1/60th) |
 |
| I like this photo because of the perspective. It was taken with a wide angle lens and I also was using external flash to light from the upper right. The staff is held right near the lens to add some depth to the photo. I probably should have stopped down the lens more, but it is still discernible as is. (D600, 28mm, f2.8, ISO 560, 1/125th) |
Now on to the more technical side of things, about half the time starting from Friday to half of Saturday, I had a dual camera setup and a large backpack full of gear. The only thing I didn’t bring was a tripod or light stand because I knew I wouldn’t put forth the effort to use it.
Here is a crop of a photo my friend had taken when I was fully kitted out:
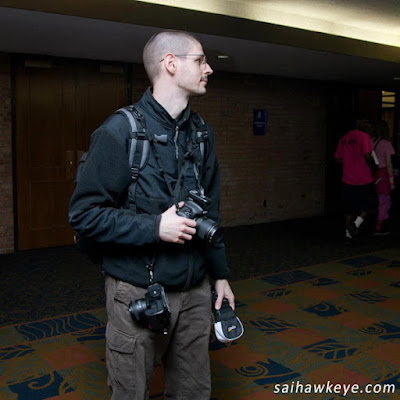 |
| Me with cameras |
- Nikon D600 & 28mm lens in the front (Kata dual purpose strap connected to the backpack lugs).
- Nikon D7000 & 50mm lens on a Carry Speed shoulder strap.
- Yongnuo RF-603 flash triggers and a Yongnuo YN460-II + diffuser.
- Ape Case ACPRO1900 backpack with quite a lot of additional gear in it.
- (70-210mm f4 lens was used at the cosplay auction with success, I felt it worked great in that situation! Well worth the low-ish cost of the lens.)
The majority of my photos with that setup were done with the D600 and 28mm lens. For hallway cosplay photos, the wide perspective is the most manageable in cramped situations. I used the D7000 and 50mm lens occasionally for portrait style images. In retrospect I should have used it more, but it’s difficult to switch off to a second camera in those situations. I also used the D7000 in more detailed shoots where I have more time.
The main challenge was with flash photography. The flash equipment I have is totally manual. That means I have to control everything. In fast paced situations, it starts to get more frustrating than anything else from the micro management of settings. I’m also thinking that extra effort takes away from other aspects like framing the subject and posing them.
It really isn’t as simple as taking more time when you interrupt someone to ask for a few quick photos. I’ll probably continue to use that method, but moving forward, I will try more simple or elaborate options. The first is just to not use flash unless absolutely necessary to achieve my main goals. My equipment is strong in low light, so that is a solid option I used for the second half of the convention. The other option is spending a considerable amount of money on TTL equipment. Though, I don’t see option 2 being possible from a cost standpoint.
At this point, I feel that I need to step back a bit on lighting to re-focus on framing, and more importantly, communicate to the cosplayer how I want them to pose. I had some issues with that at A.A. where I couldn’t get my directions across that well.
For the second half the convention, I limited my equipment to the D600 and 1-2 lenses stowed in a messenger bag. This was much more convenient and allowed me to put a bit more effort into other aspects of taking photos. I used the 50mm lens on the D600 a lot and did a decent job with that even though it still feels a bit tight in FF. I also used the 85mm lens for that cosplay contest.
Below is my companion article I wrote with a focus on the convention itself rather than just photography.
Hey there! CVFTA just visited another convention. This time it was a new smaller convention in Rockford, Illinois called "Anime Apocalypse" that happened from the 21st to 23rd of December at a hotel called the Clock Tower Resort. Maybe you can see the Mayan calendar doomsday reference there? We are still alive, so that didn't pan out for the doomsday theorists, but we did have a nice convention to attend and my photos taken there will be appreciated instead of burned in an apocalyptic world ending cinder.
 |
| Cosplay |
Anyways, I enjoyed the convention and will certainly be back next year (maybe under a different convention name this time?) if it turns into a reoccurring thing. For me, it is close enough that I don't have to fork out the expense of a room, which is great. Not often does that happen, but it is a welcome occurrence. I was able to attend at least a few hours of all three days.
 |
| A photoshoot with a friend in the small hotel arcade. |
The convention was one of the smaller ones I had been to, but it still had a nice turnout.
 |
| A friend built and wore this armor. |
I took a considerable number of cosplay photos and I also attended a few panels and events. The links to all of the photos are above, but here are a few highlights of the convention:
 |
| Saihawkeye |
 |
| A local cosplaying Taiga |
 |
| A friend with a light saber. |
I met a few members of the photography group called "The Enthusiasts" that had a photo booth setup. A nice group of people. Check them out at conventions for photos if you get the chance.

I attended a few panels and events such as the cosplay auction for PAWS benefit, cosplay contest, cosplay photography, Robotech, prop safety and etiquette, foam sword battles, Super Tokusatsu, and intermediate cosplay construction. All of them were interesting and worth checking out.
 |
| photobomb! |
Probably the best part of the convention, besides being a short drive for me, was the staff. They were polite and hassle free. I never once had any issues and was able to photograph things like the cosplay auction without any restriction. It was a pleasant change from larger conventions.